RecyclerView是Android一個更強大的控件,其不僅可以實現和ListView同樣的效果,還有優化了ListView中的各種不足。其可以實現數據縱向滾動,也可以實現橫向滾動(ListView做不到橫向滾動)。接下來講解RecyclerView的用法。
RecyclerView 基本用法
因為RecyclerView屬於新增的控件,Android將RecyclerView定義在support庫裏。若要使用RecyclerView,第一步是要在build.gradle中添加對應的依賴庫。
添加RecyclerView 依賴庫
在app/build.gradle中的dependencies閉包添加以下內容:
1
| implementation 'com.android.support:recyclerview-v7:27.1.1'
|
然後點擊頂部的Sync Now進行同步
修改 activity_main.xml
1
2
3
4
5
6
7
8
9
10
11
12
13
| <LinearLayout xmlns:android="http://schemas.android.com/apk/res/android"
xmlns:app="http://schemas.android.com/apk/res-auto"
xmlns:tools="http://schemas.android.com/tools"
android:layout_width="match_parent"
android:layout_height="match_parent"
>
<android.support.v7.widget.RecyclerView
android:id="@+id/recycler_view"
android:layout_width="match_parent"
android:layout_height="match_parent"
/>
</LinearLayout>
|
由於RecyclerView不是內置在系統SDK中,需要把其完整的包名路徑寫出來
新建 Fruit.java
1
2
3
4
5
6
7
8
9
10
11
12
13
14
15
16
17
18
19
| public class Fruit {
private String name;
private int imageId;
public Fruit(String name, int imageId){
this.name = name;
this.imageId = imageId;
}
public String getName() {
return name;
}
public int getImageId() {
return imageId;
}
}
|
新建 fruit_item.xml
創建ImageView來顯示水果圖片,TextView來顯示水果名字。
1
2
3
4
5
6
7
8
9
10
11
12
13
14
15
16
17
18
19
| <LinearLayout
xmlns:android="http://schemas.android.com/apk/res/android"
android:layout_width="match_parent"
android:layout_height="wrap_content"
>
<ImageView
android:layout_width="wrap_content"
android:layout_height="wrap_content"
android:id="@+id/fruit_image"/>
<TextView
android:layout_width="wrap_content"
android:layout_height="wrap_content"
android:id="@+id/fruitname"
android:layout_gravity="center_vertical"
android:layout_marginLeft="10dp"/>
</LinearLayout>
|
新增適配器 FruitAdapter
為RecyclerView新增適配器FruitAdapter,並讓其繼承於RecyclerView.Adapter,把泛型指定為FruitAdapter.ViewHolder。
1
2
3
4
5
6
7
8
9
10
11
12
13
14
15
16
17
18
19
20
21
22
23
24
25
26
27
28
29
30
31
32
33
34
35
36
37
38
39
40
| public class FruitAdapter extends RecyclerView.Adapter<FruitAdapter.ViewHolder> {
private List<Fruit> mFruitList;
static class ViewHolder extends RecyclerView.ViewHolder{
ImageView fruitImage;
TextView fruitName;
public ViewHolder (View view)
{
super(view);
fruitImage = (ImageView) view.findViewById(R.id.fruit_image);
fruitName = (TextView) view.findViewById(R.id.fruitname);
}
}
public FruitAdapter (List <Fruit> fruitList){
mFruitList = fruitList;
}
@Override
public ViewHolder onCreateViewHolder(ViewGroup parent, int viewType){
View view = LayoutInflater.from(parent.getContext()).inflate(R.layout.fruit_item,parent,false);
ViewHolder holder = new ViewHolder(view);
return holder;
}
@Override
public void onBindViewHolder(ViewHolder holder, int position){
Fruit fruit = mFruitList.get(position);
holder.fruitImage.setImageResource(fruit.getImageId());
holder.fruitName.setText(fruit.getName());
}
@Override
public int getItemCount(){
return mFruitList.size();
}
|
定義內部類ViewHolder,並繼承RecyclerView.ViewHolder。傳入的View參數通常是RecyclerView子項的最外層佈局。
FruitAdapter構造函數,用於把要展示的數據源傳入,並賦予值給全局變量mFruitList。
FruitAdapter繼承RecyclerView.Adapter。因為必須重寫onCreateViewHolder(),onBindViewHolder()和getItemCount()三個方法
onCreateViewHolder()用於創建ViewHolder實例,並把加載的佈局傳入到構造函數去,再把ViewHolder實例返回。onBindViewHolder()則是用於對子項的數據進行賦值,會在每個子項被滾動到屏幕內時執行。position得到當前項的Fruit實例。getItemCount()返回RecyclerView的子項數目。
修改 MainActivity.java
1
2
3
4
5
6
7
8
9
10
11
12
13
14
15
16
17
18
19
20
21
22
23
24
25
26
27
28
29
30
31
32
33
34
35
36
37
38
39
40
41
42
| public class MainActivity extends AppCompatActivity {
private List<Fruit> fruitList = new ArrayList<>();
@Override
protected void onCreate(Bundle savedInstanceState) {
super.onCreate(savedInstanceState);
setContentView(R.layout.activity_main);
initFruits();
RecyclerView recyclerView = (RecyclerView) findViewById(R.id.recycler_view);
LinearLayoutManager layoutManager = new LinearLayoutManager(this);
recyclerView.setLayoutManager(layoutManager);
FruitAdapter adapter = new FruitAdapter(fruitList);
recyclerView.setAdapter(adapter);
}
private void initFruits() {
for (int i = 0; i < 2; i++) {
Fruit apple = new Fruit("Apple", R.drawable.apple_pic);
fruitList.add(apple);
Fruit banana = new Fruit("Banana", R.drawable.banana_pic);
fruitList.add(banana);
Fruit orange = new Fruit("Orange", R.drawable.orange_pic);
fruitList.add(orange);
Fruit watermelon = new Fruit("Watermelon", R.drawable.watermelon_pic);
fruitList.add(watermelon);
Fruit pear = new Fruit("Pear", R.drawable.pear_pic);
fruitList.add(pear);
Fruit grape = new Fruit("Grape", R.drawable.grape_pic);
fruitList.add(grape);
Fruit pineapple = new Fruit("Pineapple", R.drawable.pineapple_pic);
fruitList.add(pineapple);
Fruit strawberry = new Fruit("Strawberry", R.drawable.strawberry_pic);
fruitList.add(strawberry);
Fruit cherry = new Fruit("Cherry", R.drawable.cherry_pic);
fruitList.add(cherry);
Fruit mango = new Fruit("Mango", R.drawable.mango_pic);
fruitList.add(mango);
}
}
}
|
LayoutManager用於指定RecyclerView的佈局方式。LinearLayoutManager指的是線性佈局。
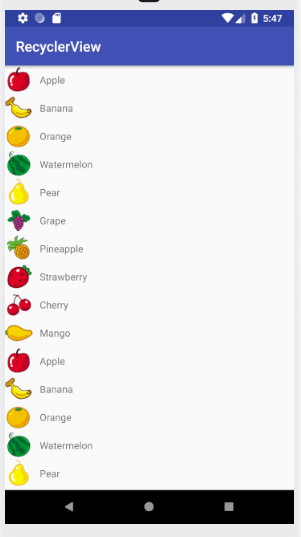
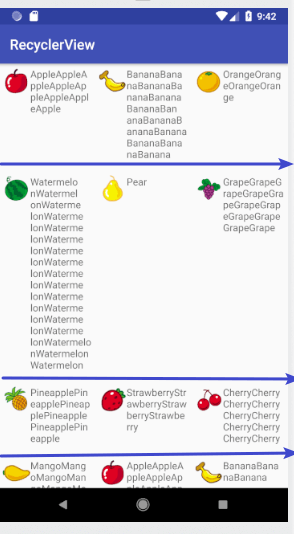
運行效果:

修改RecyclerView 顯示效果
橫向滾動
修改 fruit_item.xml
1
2
3
4
5
6
7
8
9
10
11
12
13
14
15
16
17
18
19
20
| <LinearLayout
xmlns:android="http://schemas.android.com/apk/res/android"
android:layout_width="100dp"
android:layout_height="wrap_content"
android:orientation="vertical"
>
<ImageView
android:layout_width="wrap_content"
android:layout_height="wrap_content"
android:id="@+id/fruit_image"
android:layout_gravity="center_horizontal"/>
<TextView
android:layout_width="wrap_content"
android:layout_height="wrap_content"
android:id="@+id/fruitname"
android:layout_gravity="center_horizontal"
android:layout_marginTop="10dp"/>
</LinearLayout>
|
把LinearLayout改成垂直排列,因為水果名字長度不一樣,把寬度改為100dp。
ImageView和TextView都改為水平居中
修改MainActivity.java
1
2
3
4
5
6
7
8
9
10
11
12
| @Override
protected void onCreate(Bundle savedInstanceState) {
super.onCreate(savedInstanceState);
setContentView(R.layout.activity_main);
initFruits();
RecyclerView recyclerView = (RecyclerView) findViewById(R.id.recycler_view);
LinearLayoutManager layoutManager = new LinearLayoutManager(this);
layoutManager.setOrientation(LinearLayoutManager.HORIZONTAL);
recyclerView.setLayoutManager(layoutManager);
FruitAdapter adapter = new FruitAdapter(fruitList);
recyclerView.setAdapter(adapter);
}
|
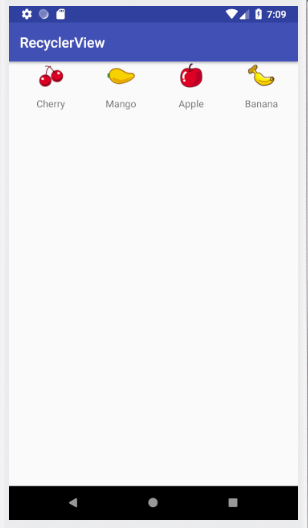
通過調用setOrientation()把佈局的排列方向改為水平排列。
得益於RecyclerView的設計,我們可以通過LayoutManager實現各種不同的排列方式的佈局。
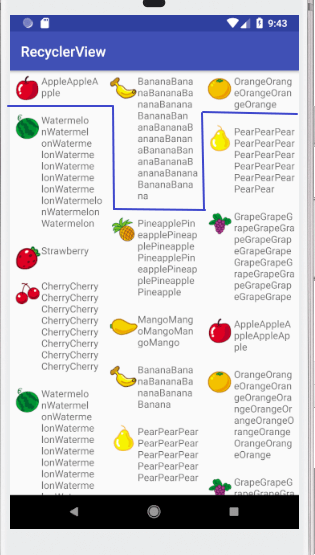
運行結果:
除了LinearLayoutManager,RecyclerView還提供了GridLayoutManager(網格佈局)和StaggeredGridLayoutManager(瀑布流佈局)
GridLayoutManager
GridLayoutManager(網格佈局)
修改MainActivity.java
修改 MainActivity.java,把
1
2
| LinearLayoutManager layoutManager = new LinearLayoutManager(this);
layoutManager.setOrientation(LinearLayoutManager.HORIZONTAL);
|
換成
1
| GridLayoutManager layoutManager = new GridLayoutManager(this,5);
|
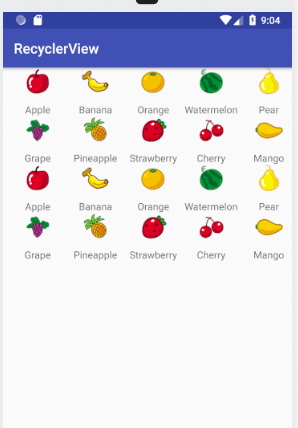
GridLayoutManager (Context context, int spanCount)
- Context: Current context, will be used to access resources.
- spanCount int: The number of columns in the grid(網格的列數)
運行結果:
StaggeredGridLayoutManager
StaggeredGridLayoutManager(瀑布流佈局)
修改fruit_item.xml
1
2
3
4
5
6
7
8
9
10
11
12
13
14
15
16
17
18
19
20
21
22
| <?xml version="1.0" encoding="utf-8"?>
<LinearLayout
xmlns:android="http://schemas.android.com/apk/res/android"
android:layout_width="match_parent"
android:layout_height="wrap_content"
android:layout_margin="5dp"
>
<ImageView
android:layout_width="wrap_content"
android:layout_height="wrap_content"
android:id="@+id/fruit_image"
android:layout_gravity="center_horizontal"/>
<TextView
android:layout_width="wrap_content"
android:layout_height="wrap_content"
android:id="@+id/fruitname"
android:layout_gravity="left"
android:layout_marginTop="10dp"/>
</LinearLayout>
|
把LinearLayout的寬度設為match_parent是因為瀑布流的寬度是 根據佈局的列數來自動適配的,而不是固定值 。(GridLayoutManager也是 根據佈局的列數來自動適配的)
修改 MainActivity.java
1
2
3
4
5
6
7
8
9
10
11
12
13
14
15
16
17
18
19
20
21
22
23
24
25
26
27
28
29
30
31
32
33
34
35
36
37
38
39
40
41
42
43
44
45
46
47
48
49
| public class MainActivity extends AppCompatActivity {
private List<Fruit> fruitList = new ArrayList<>();
@Override
protected void onCreate(Bundle savedInstanceState) {
super.onCreate(savedInstanceState);
setContentView(R.layout.activity_main);
initFruits();
RecyclerView recyclerView = (RecyclerView) findViewById(R.id.recycler_view);
StaggeredGridLayoutManager layoutManager = new StaggeredGridLayoutManager(3,StaggeredGridLayoutManager.VERTICAL);
recyclerView.setLayoutManager(layoutManager);
FruitAdapter adapter = new FruitAdapter(fruitList);
recyclerView.setAdapter(adapter);
}
private void initFruits() {
for (int i = 0; i < 2; i++) {
Fruit apple = new Fruit(getRandomLengthName("Apple"), R.drawable.apple_pic);
fruitList.add(apple);
Fruit banana = new Fruit(getRandomLengthName("Banana"), R.drawable.banana_pic);
fruitList.add(banana);
Fruit orange = new Fruit(getRandomLengthName("Orange"), R.drawable.orange_pic);
fruitList.add(orange);
Fruit watermelon = new Fruit(getRandomLengthName("Watermelon"), R.drawable.watermelon_pic);
fruitList.add(watermelon);
Fruit pear = new Fruit(getRandomLengthName("Pear"), R.drawable.pear_pic);
fruitList.add(pear);
Fruit grape = new Fruit(getRandomLengthName("Grape"), R.drawable.grape_pic);
fruitList.add(grape);
Fruit pineapple = new Fruit(getRandomLengthName("Pineapple"), R.drawable.pineapple_pic);
fruitList.add(pineapple);
Fruit strawberry = new Fruit(getRandomLengthName("Strawberry"), R.drawable.strawberry_pic);
fruitList.add(strawberry);
Fruit cherry = new Fruit(getRandomLengthName("Cherry"), R.drawable.cherry_pic);
fruitList.add(cherry);
Fruit mango = new Fruit(getRandomLengthName("Mango"), R.drawable.mango_pic);
fruitList.add(mango);
}
}
private String getRandomLengthName(String name){
Random random = new Random();
int length= random.nextInt(20)+1;
StringBuilder builder = new StringBuilder();
for (int i =0;i<length;i++){
builder.append(name);
}
return builder.toString();
}
}
|
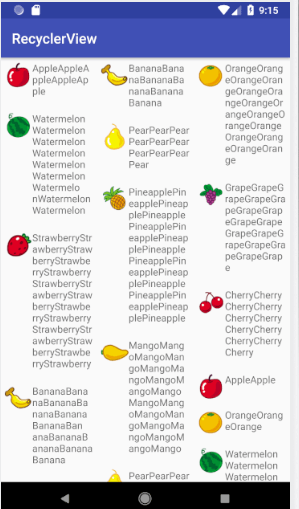
StaggeredGridLayoutManager layoutManager = new StaggeredGridLayoutManager(3,StaggeredGridLayoutManager.VERTICAL);
StaggeredGridLayoutManager傳入2個參數,第一個是佈局的列數,第二個是佈局的排列方向。
random.nextInt(20)+1 產生1-20的隨機數
運行效果:
GridLayoutManager和StaggeredGridLayout的區別
左圖是GridLayoutManager,右圖是StaggeredGridLayout。
當從顯示效果來看,已經一目瞭然。
GridLayoutManager是會固定高度的,所以會留下很多空白區域。
相反,StaggeredGridLayout並不會固定高度,以至於就算子項的高度不一致,下一行的會自動靠攏上一行。
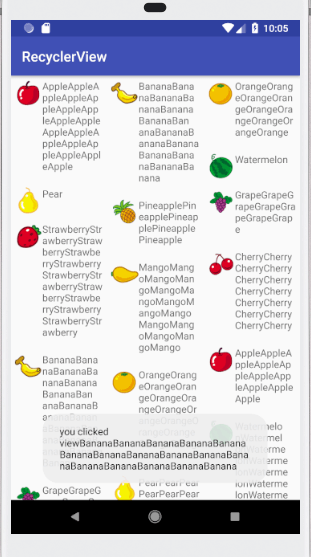
RecyclerView 的點擊事件
修改 FruitAdapter.java
1
2
3
4
5
6
7
8
9
10
11
12
13
14
15
16
17
18
19
20
21
22
23
24
25
26
27
28
29
30
31
32
33
34
35
36
37
38
39
40
41
42
43
44
45
46
47
48
49
| public class FruitAdapter extends RecyclerView.Adapter<FruitAdapter.ViewHolder> {
private List<Fruit> mFruitList;
static class ViewHolder extends RecyclerView.ViewHolder{
View fruitView;
ImageView fruitImage;
TextView fruitName;
public ViewHolder (View view)
{
super(view);
fruitView = view;
fruitImage = (ImageView) view.findViewById(R.id.fruit_image);
fruitName = (TextView) view.findViewById(R.id.fruitname);
}
}
public FruitAdapter (List <Fruit> fruitList){
mFruitList = fruitList;
}
@Override
public ViewHolder onCreateViewHolder(ViewGroup parent, int viewType){
View view = LayoutInflater.from(parent.getContext()).inflate(R.layout.fruit_item,parent,false);
final ViewHolder holder = new ViewHolder(view);
holder.fruitView.setOnClickListener(new View.OnClickListener() {
@Override
public void onClick(View view) {
int position = holder.getAdapterPosition();
Fruit fruit = mFruitList.get(position);
Toast.makeText(view.getContext(), "you clicked view" + fruit.getName(), Toast.LENGTH_SHORT).show();
}
});
holder.fruitImage.setOnClickListener(new View.OnClickListener() {
@Override
public void onClick(View view) {
int position = holder.getAdapterPosition();
Fruit fruit = mFruitList.get(position);
Toast.makeText(view.getContext(), "you clicked image" + fruit.getName(), Toast.LENGTH_SHORT).show();
}
});
return holder;
}
...
}
|
修改ViewHolder,添加fruitView變量來保存子項最外層佈局的實例。
運行效果: